Leave Your Message
How to Install PVC Wall Panels begins with a sound surface, careful measurements, and a little patience. Panel Wall Pvc systems can refresh a bathroom, utility room, or feature wall, but neat results depend on preparation. Installation specialist Ethan Cole offers a practical reminder: “A straight first panel saves time on every panel that follows.” Treat that as a useful rule, not a shortcut. Check the manufacturer’s instructions, since panel profiles, adhesives, and fixing methods can vary.
Start by measuring the wall in several places. Walls are not always square. Let the panels acclimate in the room, then inspect them for damage before cutting. Make sure the surface is clean, dry, and stable; repair loose areas before covering them. Mark a level starting line, and plan where joints and edge trims will sit. A fine-tooth saw and sharp utility knife help create cleaner cuts. Wear suitable eye protection, and keep fingers clear of cutting edges.
Dry-fit the first panel. Check its alignment again. A small angle near the bottom can become a visible gap near the ceiling. Apply only the adhesive or fasteners recommended for your panel system, then press each section firmly into place. Fit trims without forcing them, and leave any expansion clearance specified by the manufacturer. One detail deserves a second look: corners and pipe openings often need more patience than broad wall sections. The work may not be perfect on the first pass. Recheck the joints before the adhesive sets, and correct small alignment issues while they remain easy to fix.
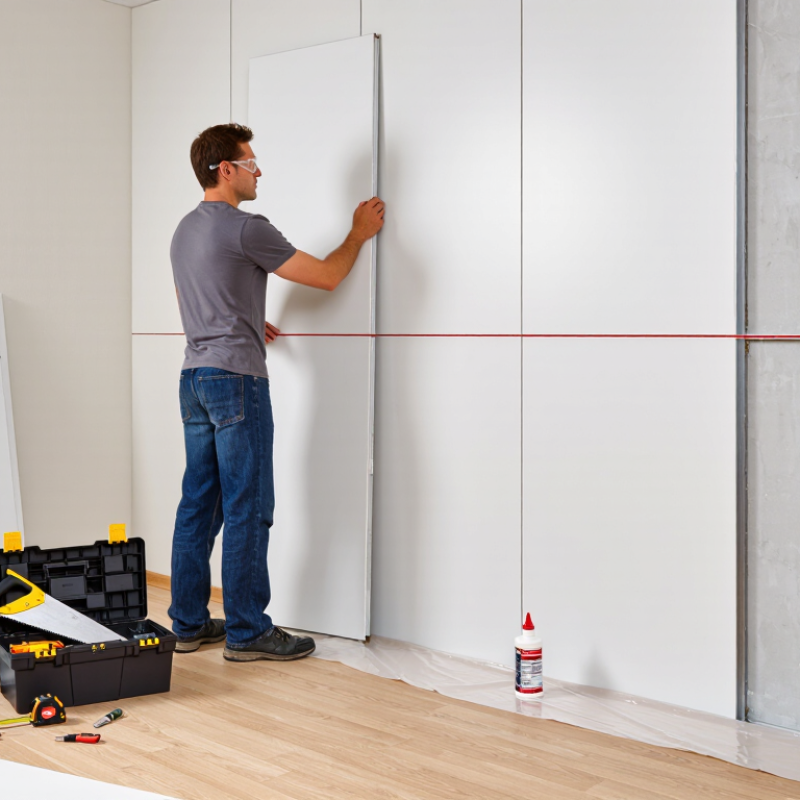
A sound installation begins with a clean, dry, stable wall. Remove dust, grease, loose paint, and protruding nails; patch dents and let repairs dry fully. Check the surface with a long straightedge, especially around corners and window frames. PVC panels can follow uneven walls, leaving visible waves or gaps. If moisture is present, find its source before covering the area. A panel is not a leak repair.
Gather a tape measure, pencil, level, fine-tooth saw, utility knife, protective eyewear, and the fixing method specified for your panels. Keep a square nearby for clean cuts around outlets. Read the installation instructions before choosing adhesive or fasteners; compatibility matters. The U.S. Environmental Protection Agency’s indoor-air-quality guide reports that indoor VOC levels may be two to five times outdoor levels. Ventilate the room when using adhesives, and follow their safety instructions. Measure twice. A rushed mark is easy to regret.
Tips: Dry-fit the first panel and check it with a level before fixing it. Leave the manufacturer’s recommended expansion gap at edges. Keep cut pieces labeled; similar lengths can be confusing. My own checklist would include one more wall check, because apparently one is never quite enough.
| Step | Task | Tools or Materials | Practical Check |
|---|---|---|---|
| 1 | Read the panel installation instructions and confirm the approved fixing method for the wall and room conditions. | Panel instructions, tape measure, pencil | Check whether the system calls for adhesive, mechanical fixings, battens, or a combination. Requirements vary by panel and substrate. |
| 2 | Clear the work area and protect the floor and nearby surfaces. | Drop cloth or protective sheet, painter’s tape, waste container | Keep a clear path for handling panels and enough space to measure and cut them safely. |
| 3 | Turn off power at the circuit breaker before working near switches, outlets, or wiring. Remove cover plates only when it is safe to do so. | Non-contact voltage tester, insulated screwdriver | Verify that the relevant circuit is de-energized. Do not cut into or cover electrical boxes; follow local electrical requirements. |
| 4 | Remove loose paint, wallpaper, dust, grease, and other material that could interfere with adhesion or fixing. | Scraper, suitable cleaner, sponge, cloth, vacuum | Let the wall dry fully after cleaning. Use a cleaning product suitable for the existing wall surface. |
| 5 | Inspect the wall for leaks, dampness, mold, loose plaster, or damaged areas and address problems before covering it. | Flashlight, moisture meter if appropriate, repair materials | Do not install panels over active leaks or unresolved moisture damage. Follow the panel instructions for suitable wall conditions. |
| 6 | Check whether the wall is sufficiently flat and stable for the selected panel system. | Straightedge or level, pencil, filler or approved battens if needed | Correct bumps, hollows, or unstable areas as required by the installation instructions; a flat substrate helps panels align properly. |
| 7 | Measure the wall and mark the planned panel layout, including corners, edges, and openings. | Tape measure, level, pencil, square | Plan cuts to avoid narrow or awkward pieces where practical. Recheck measurements before cutting. |
| 8 | Gather cutting and fixing tools suitable for the panel material and chosen installation method. | Fine-tooth saw or panel-compatible cutting tool, utility knife if suitable, drill/driver, compatible fixings or adhesive | Use only tools and adhesives approved for the panels. Follow product instructions for cutting, fixing, ventilation, and curing. |
| 9 | Prepare personal protective equipment and keep it on hand during measuring, cutting, and installation. | Safety glasses, work gloves, dust mask or respirator appropriate to the task | Follow tool and material safety instructions, and control dust and ventilation as appropriate. |
| 10 | Store panels in the installation area before fitting if the product instructions require acclimation. | Clean, dry storage area; flat, supported surface | Follow the manufacturer’s stated storage and acclimation conditions; timing and temperature requirements differ between products. |
Preparation reminder: Wall condition, fixing method, expansion gaps, and required accessories depend on the specific panel system. Always follow its installation instructions and applicable local building and electrical requirements.